 Skip to content
 PADI IDC Revision Dive Theory
Equipment
Tanks / cylinders – Tank markings
Govt. Agency Supervision / Approval DOT or DOT/CTC = Dept. of Transport or Canadian Transport Comm.
Metal Type: 3AA = Steel / SP6498, E6498 or 3AL = Aluminium
Working Pressure: Maximum pressure lbs / inch2 (steel = 2250, al = 3000-4000 psi)
Serial Number: 12345 = Unique to tank Manufacturer
PST = Manufacturer of the Cylinder Hydrostatic Test Date / Hydrostatic Tester’s Mark
6 1996+ = Hydrostatic Test Date (Month, initials of tester, year)
There is lots of Dive Theory on Equipment below and also here More Dive Equipment Revision

+10% Overfill Allowed + = 10% overfill allowed on STEEL TANKS ONLY
These marking should always be checked before filling.
This is important even in different countries with different tank markings.
Cylinders manufactured, have specification stamped on the cylinder which include Working Pressure, Test Pressure, Data of Manufacture, Capacity and Weight.
Before filling a scuba tank with air, you should always check the tank markings, specifically looking for a current hydrostatic and pressure test date and maximum capacity / pressure. Don’t overfill scuba cylinders.
Tank Metals
| STEEL | ALUMINIUM | |
| Resistance to corrosion | Quicker (lasts longer) | Slower |
| Galvanic Action | Brass values can react | Brass values can react |
| With steel (rust) | With Al. (Al. Oxide) | |
| Weight | Heavier | Lighter |
| Size | Smaller (stronger) | Larger (less strong) |
| Buoyancy | Less buoyant (diver is not affected as tank pressure drops) | Can be more buoyant (more weight required as tank pressure drops) |
| Normal Working Pressure | 200 Bar (300 Bar tec. Diving) | 220 Bar |
| Hardness | Harder | Softer |
| Maintenance | Harder to clean | Easier to clean preferred by dive operators) |
| Availability | Less available | More available |
| Technical Diving | More popular (especially DIN) | Less popular |
| Bottom | Round | Flat |
Cylinders
Kevlar wrapped composite cylinders or Carbon-Dive that can be filled up to 300bar and are very buoyant even when full. These are not common and must be treated with extreme care not to damage the carbon fibre Kevlar.
The Aluminium Tank with an International valve or DIN is the most common tank / valve combination in the world of visual inspection.
A visual inspection test are required by international laws (which may vary from country to country) conducted on all SCUBA tanks (steel and aluminium) at least once (1) a year. Never assume tank markings are unimportant on cylinders. In most European Union countries, visual inspection is required every 2 and half years, and a hydrostatic test every five years.
Visual Inspections
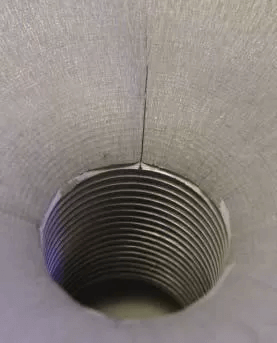
A visual inspection is conducted by removing the tank valve, looking inside the tank for any corrosion (steel tanks = IRON OXIDE – RUST / aluminium tanks = ALUMINIUM OXIDE). Iron oxide is orange or black and falls away from the tank, normally in layer like filo pastry. Visual inspections also examine the outside and inside of cylinders for defects like: bulges, gouges, misshapes, cracks, thickness, pitting and damages that could cause the cylinder to fail its test.
Aluminium oxide tends to be of a white or gray powder most common found between the valve and the tank neck (galvanic action aluminium tanks). If there is any corrosion the tanks will be chemically and/or machined cleaned. If the corrosion has done damage to the walls of the inside of the tank, then pits and gouges must be measured with pit gauges or ultrasonic thickness testing devices to see if the corrosion is too deep, which will end the life of the cylinder and be destroyed.
The threading at the neck of the tank (where the tank valve screws into) is also inspected for any damage. First a precision threading gauge is inserted to test the threads for wear-n-tear. This thread test uses a GO – NO GO method, if more than a few turns on the no-go then the thread is considered worn and destroyed. This is a very important testing procedure for aluminium tanks as different types of aluminium’s have been found to have weakness at this point. This could have occurred during manufacturing and/or over-pressurisation of a tank.
A testing method called None-Destructive-Testing (NDT) is done, using an EDDY current test machine. This is like an X-ray of the thread neck, checking for hair-line cracks. These cracks can be invisible to the naked eye but not the EDDY TESTER.
More Tanks Fail A Visual Than In Hydro Testing. Fact!
Hydrostatic Inspection
Hydrostatic inspection = water pressure test
Laws differ from country to country
US / UK- required every five years Elsewhere or according to local laws
A hydrostatic test is performed to ensure that the tank has no weak points and the metal still has elasticity in the body, and to make sure that the tank can withstand its own specific amount of high-pressure air used for diving.
A hydrostatic inspection is conducted by placing the tank in a pressure container filled with water. Then tank itself is filled with water, which will be used to pressurize the tank to approximately its own TEST pressure, NOT its working pressure which is less.
The use of water to pressurize the scuba cylinder is a much safer option than to pressurize with compressed air. Water is incompressible but compressed air will expands back to its original size, this would cause catastrophic damage to the cylinder, the hydro test chamber and the technician.
Each cylinder and manufacturer has its own testing pressure of their tanks which is greater than its working pressure.
NOT ALL TEST AND WORKING PRESSURES ON EACH CYLINDER ARE THE SAME!
Afterwards the tank is checked for any damage or disfigurement (shape change) that may have occurred during the test. Certain circumstances can weaken tanks before a hydrostatic test is required.
Have tanks hydrostatically tested after exposure to any of the following:
- Tumbling (or sandblasting) to remove corrosion.
- Damage due to impact
- Exposure to heat in excess of 82 degrees Celsius may affect the metals integrity.
- If left unused for more than 2 years
- Never paint a cylinder using a heat painting process such as that used on automobiles.
Tank valves
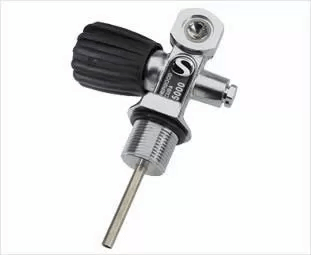
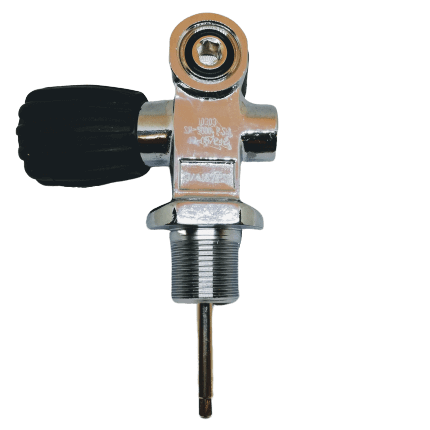
K valve are our modern tank valves. The K-valve is (kommon) a simple on – off valve that will open or close the tank pressure coming out of the tank opening. DIN Regulator screws into the tank valve and a YOKE, A-Clamp or an International fitting is a way your scuba regulator first stage attaches to the Tank Valve
J valve (which are no longer used but are still found) are also called RESERVE VALVES. They were used before pressure gauges came into use for divers in the early 1970s that had NO SPG’s when they dived. It’s a spring-loaded valve on the scuba valve, which would close off a divers air supply once the pressure in the tank became low (between 40-60 Bar). The diver would then reach back or behind and pull the pin or lever, which would then re-open the valve. It was used as an Early Warning Mechanism. The diver would then know that he had a RESERVE of air and had to make his way back to the surface.
When filling these tanks the pin or lever must be in the DOWN or OPEN position, to allow air back into the cylinder. If the lever is closed no air would fill the cylinder. If the lever would be left in the OPEN position, the diver would not have an early warning mechanism and when the diver began to find the regulator difficult to breath from it was the end of the air completely in the cylinder. These types of valves are rare but a understanding of the operation of these valves must be common knowledge for all divers.
DIN (Deutsche Industrie Norm) German Has a stronger connection between the tank valve and the first stage of the regulator. DIN Valves Screw into the Valve and come in two types a short 5 threads so a tank can only be filled to 232 bar / 3364 psi and a long 7 threads and a tank can now be filled to 300 bar / 4351 psi. This only connection used when a tank is 300 bar / 4351 psi high tank pressure. These are the preferred valve by Wreck, Cave and Technical divers. The Regulator First Stage has the o-ring, the tank only has a hole with threads. Adaptors and insert can be found to cross convert for these valves.
- Has a better seal.
- Is stronger.
- Can use higher air pressure
- Preferred by Tech divers
- Regulator has the o-ring as the tank does not have one
- Can get adaptors to allow DIN regs on International Valves
NITROX DIN valves, with a metric M 26×2 fittings are on both the cylinder and the first stage regulator. These are to be used with any oxygen content above 23%. From August 2008, these shall be required for all diving equipment used with nitrox or high oxygen contents in Europe. The idea behind this new standard is to prevent a rich oxygen mixture being filled in to a normal AIR (21%) cylinder and is not O2 clean. This is just a standard in Europe and not the rest of the world. So if you dived in Egypt, USA or Asia you would need an adaptor for your NITROX Regulator.
Burst Disk is a thin copper disk that is located on the valve and will break if the tank pressure becomes too high (140% of working pressure). Disks are replaced every year, due to weakening of disk from filling / emptying. Instead of the tank exploding the air will vent (come out) through the burst disk. Newer disks, which vent air from both sides prevents the spinning of cylinder regulators
We describe the ‘most’ common regulators in use as Open Circuit, Fail Safe and Balanced, which is open circuit scuba and typically used by recreational divers.
Open Circuit Scuba The diver inhales air from the cylinder via a demand valve regulator and exhales it into the water, thus the circuit is open because none of the air is recycled. Air is released into the open. When or should a typical regulator break, it will break in an open – free flowing action and will never break with a shut off of air, again it will break in an open action as long as air remains in the tank. Typical Open circuit doesn’t recycle breathing gases; it is the main stay of recreational diving for many reasons:
- It’s a much simpler design, which makes it reliable and less costly (closed and semi-closed systems are more prone to malfunctions)
- It requires only a cylinder of air (closed and semi-closed units require chemicals and access to pure gases or enriched air)
- It is much easier to use
- It is much simpler to maintain and service.
Semi-closed circuit scuba
The diver inhales from a breathing bag that receives a steady flow of gas (usually enriched air).
Excess can gases steadily flows and trickles out through a valve in to the open. The circuit is semi-open because part of the gas is recycled and part of it is released (except to vent expanding air on ascent).
Closed circuit scuba
The diver exhales from a breathing bag and then exhales back into the breathing bag (Counter Lung). The gas has a Carbon dioxide scrubber and electronic sensors control flow of oxygen and other gases as required. The circuit is closed because ALL gases is recycled and none released (except to vent expanding air on ascent)
First stage
When high pressure (200 – 300 Bar) from a tank enters the first stage the first stage will do two things:
- It will reduce the HIGH PRESSURE from the tank to between 9-12 Bar. This new pressure is called INTERMEDIATE PRESSURE.
- The first stage will channel, or guide, the tank pressure to the HIGH-PRESSURE HOSE or a DIGITAL PRESSURE GAUGE (so that the diver can monitor tanks air pressure) which will contain an electronic transducer.
- When the transducer feels pressure it will transmit a small amount of electric current, the more pressure exerted the more current.
- The intermediate pressure will also go to the second stages and the low pressure inflator hose for the BCD
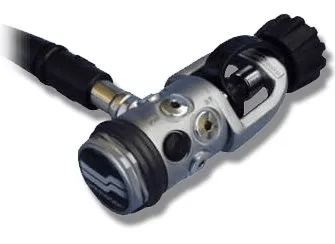
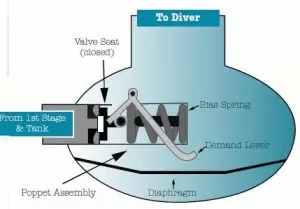
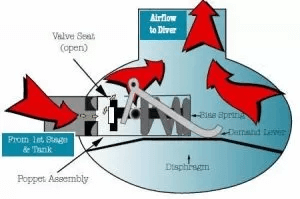
Second stage
As a diver inhales the diaphragm at the front of the regulator flexes inwards. Air from the first stage moves downstream to the second stage, which will moved inward by the flex of the diaphragm and press down onto a lever.
This allows intermediate/downstream pressure air coming from the first stage to enter the second stage where it will become AMBIENT / ABSOLUTE PRESSURE so that the diver may breathe. In more expensive regulators the lever opens a pilot valve, which in turn opens the main valve with the flow of air, a more complicated design that provides greater/better airflow with less breathing effort. In regulators with Upstream Valves the pilot valve moves against the airflow.
Second stages can be your primary regulator or your alternative air source or octopus. Your primary regulator has a shorter hose around 24 inches/61 cm and should be less attractive to divers who may need air in the unlikely event of an emergency.
Alternative Air Source or Octopus is normally a brightly coloured yellow hose around 36 inches/91 cm. This regulator should be kept in plain view for other divers to see between your chin and the rib cage (triangular area). This is the regulator that you or another dive should take if they run low on air or their air suddenly stops.
Unbalanced
A regulator designed so that tank air pressure resists or assists (DOES AFFECT) the opening of valves in the first stage is called an unbalanced regulator:
- Breathing will become more difficult as the tank pressure drops
- Breathing is more difficult at greater depths
- Unbalanced regulators are no longer commonly found
- Unbalanced regulators are cheaper than balanced regulators.
- Unbalanced regulators are perfect for recreational diving and NOT FOR DEEP DIVES
Balanced
A regulator designed so that tank air pressure neither resists nor assists (DOES NOT AFFECT) the opening of valves is called a balanced regulator. The tank pressure does not affect the ease of breathing, even when two divers breathe from the same first stage, and inhale at the same time. Depth is not a concern. Most modern regulators are balanced regulators. Balanced regulators are technical diver choice, as it will give a constant intermediate pressure regardless of depth or tank pressures.
Fail safe
Modern regulators are designed to free flow during a malfunction, which gives the regulator a fail-safe design. It will fail in a safe manner opening of air and continues to provide air until the tank is empty. Obviously the tank will lose air fast, so the diver must make an immediate ascent or take air provided from another air source.
Environmental seals
When diving in very cold water (such as cold water, deep diving or ice diving) the temperature drop can cause water to freeze around and inside the regulator first stage, freezing open valves, making free flowing of air. To avoid free flow in extremely cold water some regulator first stages have environmental sealing. This seal could contain silicone grease, oil or just air which doesn’t freeze, around the first stage. The silicone, oil and air transmit the ambient pressure from the surrounding water to the diaphragm or piston in the regulator and function normally.
When diving in the cold air/water:
- Only breathe from the regulator as you enter the water to avoid free flows.
- Breathing from regulators in freezing condition, fast flowing air inside the first stage can freezing very quick.
- If moisture is also contained in the breathing air from the cylinder this could also make the regulator free-flow.
Depth Gauges
Capillary Gauge
Capillary depth gauges are very inexpensive with a simple piece of clear tubing, sealed at one end and open at the other. When you dive the water goes in the tube by the ambient pressure. At 10m it is half the length of the tube, 20m a third, etc based on Boyle’s Law. They are hard to read accurately at much deeper than 10m. Accurate and mainly used when diving at altitude.
Open Bourdon Tube Gauge
Open bourdon tube gauges contain a spiral shaped tube. Water enters the tube and increasing pressure causes the tube to straighten. The straightening of the tube moves small cogs and levers and the depth gauge needle moves on a dial at the face of the gauge. Because the tube is open, clogging can be a common problem with these devices.
Oil-Filled Gauge
Oil-filled gauges also use bourdon tube design, but using a sealed tube, oil filled gauge housing. Pressure transmitted through the oil causes the tube to coil more tightly. This moves the depth gauge needle. The depth gauge is not open to the water and therefore less prone to clogging.
Diaphragm Guage
Diaphragm gauges function by connecting a flexible diaphragm to a series of levers and gears that mover the display needle. The use of a diaphragm avoids any clogging that would occur in a bourdon tube gauges
Digital Gauge
Digital Pressure Gauges are electronic gauges that can read depth or tank pressure with a electronic TRANSDUCER, which varies the electric current depending on the amount of pressure it receives, the more current the greater the pressure. It then transmits depending on the pressure to a digital display and you read the information. These offer the highest degree of accuracy and are used in dive computers and pressure transmitters to determine depth and pressure.
The most common problem with any electronic device is the event of malfunction, flood or failures. Batteries are the most common fault and you should take precaution and make sure this is not your primary computer, always have a back up table or computer.
Submersible Pressure Gauge (SPG)
The SPG works on the same principle as the bourdon tube gauge. Electronic SPGs use a pressure transducer similar to those in dive computers / electronics of depth gauges. SPGs may be integrated with some dive computers. The most recent design of transducer is on the regulator first stage that transmits the air pressure to a wrist-worn computer, eliminating the SPG hose. The most common problem with all SPGs is failure to check them and running out of air.
Compasses
There is no easier place to get lost than in the underwater environment. Modern underwater compasses contain liquid filled to damped movement and to help withstand pressure. The needle is magnetic therefore always points North. Across the center of the compass you will find a Lubber line, which is your direction line you point or aim the compass to set your heading.
Now you point your compass to the direction you wish to head looking and aiming the lubber line in your intended direction, now you need to set the rotating bezel.
To set the rotating bezel, you rotate the outer ring found on the compass face so that you have the two index marks on the bezel set between the north needle. The single index marker on the bezel should now be on the South on the needle.
Now with the compass set you head off in your intended direction keeping the NORTH NEEDLE between you two index markers as you swim in a straight line and direction of the lubber line.
Reciprocal heading is a return heading back to where you just came. To do these just simply rotate yourself and NOT TOUCHING the compass. The north needle is pointing to the SINGLE index marker. This is your reciprocal heading make your return heading back to the point you just started.
Compass Bearings are numbers from 0 to 360. In the window on the compass as you swim, the number you see the line goes through is the bearing. If your compass doesn’t contain a small window, it will be the number closest to you at the bottom of the lubber line.
Options For Carrying Gauges
Many experienced divers prefer instrument consoles wrist mounted gauges for simplicity and is the preferred and oldest method. Technical Divers like to have wrist mounted gauges, commonly on both wrist, if one hand is busy the other hand can keep an eye on the depth and information which is crucial information when Tech diving.
Your scuba regulator High Pressure hose from your first stage could have an Analogue Gauge Console which includes, oil-filled depth gauge, max-depth indicator and fits into a neat low-profile boot together with compact SPGs. Compasses can also be attached to these consoles to keep all your instruments in one place.
Please note: All gauges are a simple way of measuring a given pressure and cannot be relied on 100% unless calibrated. Use gauges as a gauge of indication to the amount shown. As with all Digital and Analogue follow manufactures recommendations and never take your readings as 100%.
Pressure
| Atmospheric Pressure | The pressure exerted by the weight of the atmosphere at sea level. It is 14.7 psi or 1 tm or 1 Bar. |
| Gauge Pressure | Is the pressure designation that uses atmospheric pressure as its zero point. Expressed as ‘g’ i.e. psig. |
| Absolute Pressure | Is a pressure that uses a vacuum as its zero point, or its equal to Atmospheric Pressure + Gauge Pressure. Expressed as ‘a’ i.e. psia or ata |
| Ambient Pressure | Same as Absolute Pressure |
| Hydrostatic Pressure | Water pressure |
What is the absolute pressure (ata) at 18m in salt water ?
18m / 10m = 1.8 atm; 1.8 atm + 1 atm = 2.8 ata
IDC Guide Fact: The Aluminium Tank with an International valve is the most common tank / valve combination in the world
Enriched Air Diving Considerations
Equipment Considerations
Because enriched air has more oxygen than air has oxygen, there is a possible greater risk for fire or explosion related to equipment that has not been properly cleaned.
Industry guidelines involving equipment used with enriched air:
- Most manufacturers require their equipment to be cleaned to oxygen service specifications if it will be exposed to more the 23 percent oxygen. The manufactures will void all warranties and hold you responsible for using this equipment above their recommendations.
- When using 40 percent oxygen, or more, special oxygen cleaning and oxygen compatible materials are recommended. This is called the ’40 percent rule’! Any piece of equipment that will be exposed to more than 40 percent oxygen requires special cleaning, lubrication and materials to meet oxygen service specifications. If such equipment is used with air from a standard source, it may need to be re-cleaned.
- Follow the manufacturer’s recommendations and guidelines with respect to using equipment with enriched air and oxygen.
Special Markings
A band around tank at least 15cm wide denoting that it contains ENRICHED AIR NITROX in Green and yellow. The top and bottom of the band should be a yellow 2.5cm band. The centre 10cm band should be green and contain the words ‘Enriched Air’, ‘Enriched Air Nitrox’, ‘Nitrox’, or similar. Yellow cylinders need only the green portion.
Visual Inspection Sticker stating the cylinder has been cleaned to oxygen service specifications. Depending on the dive shop or filling station, if you require a nitrox fill (22% O2 or more) they will ask for a dive certification and mix required. The fill station will check the cylinder for oxygen service sticker and a valid date. Also the oxygen contents will be checked for the correct mix of the last fill.
If the contents analysed were 24% O2 and the last nitrox fill sticker says 32% O2? This tells the filler that it was filled with conventional air and could contaminate the cylinder. It is the discretion of the fill station to refuse a fill or advise the cylinder be cleaned (extra charge) before they fill it with your required nitrox (even if the final blend will have less than 40 percent oxygen).
Depending on the fill stations type of filling method for if the enriched, as different blending methods can vary from one fill station to another. Modern Nitrox Membrane Compressors can squeeze out nitrogen from its compressed air leaving a higher content of oxygen.
Continuous Gas Blending using a Nitrox Stick
The Nitrox Stick is a continuous blender using O2 tanks and a patented blending “Stik” to homogeneously mix air and pure oxygen at the inlet of a high-pressure air compressor. This is a specially designed stick and should not be attempted unless properly trained as a gas blender and fully understand the gas blending method and it potential hazards of use.
Partial Pressure Blending
This Blending method requires first putting pure oxygen into the cylinder, to around 29 bars of Pure Oxygen. The blender with the top off the mix with super-clean air via specially dedicated separate filters. The tank will be filled to around 210 bars depending on the tank. This filling method with allow the pure oxygen and the air to mix and should produce a 32% Mix.
Analyzing cylinders
A contents sticker or tag identifying the current blend, the fill date, the blends maximum depth (MOD) and the analyzer / divers name. The blender is only responsible for filling the tank, even if the mix you requested was wrong.
Enriched air divers must PERSONALLY ANALYZE the contents of their cylinders before using them. They are responsible for the air they breathe. On some dive boats its normal practice to grab any full cylinder available for the next dive – this isn’t appropriate with enriched air, which practice calls for divers to use the tanks that they have personally analyzed. This is why the new European rule is for dedicated tanks that use oxygen above 22% must be fitted with a M26 valve.
What is a M26 Valve?
This is the type of scuba cylinder valve that must be fitted to any new cylinder that is going to be used with any gas greater than 22% oxygen; this is a European directive that came into force in August 2008. It looks similar to the Din type of valve, just slightly bigger and should have the information stamped or etched on the valve. This will match any regulator supplied in the European Union which has been designated for use with gas containing oxygen content greater than 22%.
In simple terms if you buy a new set of regulators for nitrox use they will come with a M26 fitting and if you buy a new cylinder for nitrox use then it will come fitted with a M26 valve. If you travel outside of Europe with your new M26 regulator, you will need a DIN adapter to convert one side to a standard DIN the other to allow your M26 regulator to fit.
What is technical diving?
When a technical diver is kitting up (getting their dive gear on), a set methodology and configuration of regulators, hoses and tanks in the dive team is required. Also because of different gasses, like high concentrations of oxygen and helium, this could be of potential hazards if placed on the wrong side of the diver or breathed at the wrong depths. With this in mind, you could be of little use to any technical diver other than assistance in lifting or passing of equipment.
Further Scuba Tank / Cylinder information
Extra information about Scuba Tanks including Visual Inspections and Safety information can be found on our scuba tanks and cylinders information page